Meet Stache Forcache, a Movember-themed AI character created using Meta AI Studio
Note: AI Studio is currently only available in the United States.
We’re a little over a week into Movember. On the 1st of the month, I wrote a blog on LinkedIn about how I will Mo My Own Way by building a men’s health chatbot. For my first exploration, I used Meta AI Studio. AI Studio enables you to quickly create AI characters and share them across Messenger, Instagram and WhatsApp.
In less than an hour using AI Studio, I was able to create and customize an AI character: a hipster, Australian barber with a passion for men’s health and Movember. Before I walk through how I did this, let me first introduce you to Stache Forcache:

Getting started with AI Studio
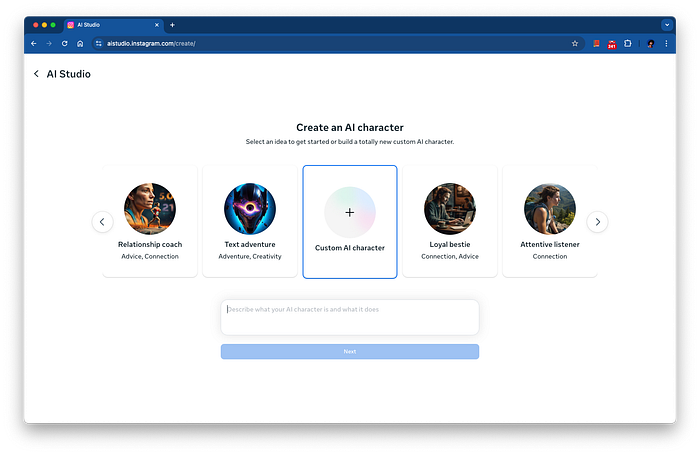
To get create your own AI character, head over to https://aistudio.instagram.com/ (you can also do this in the apps, but I’m using a web browser on a laptop). You should see something like this:

If you have already developed AI characters, you can find them under Your AI characters . You can use the Discover search box to find other people’s characters. For now, let’s get started by clicking Create an AI which will let you create a custom AI character or get started from examples.
Creating an AI character
You start by describing what your AI character is and what is does. At this stage, we can provide a high level description, we’ll get into the details later. Cycle through the examples for ideas. You can modify one of the examples or write your own under “Custom AI character”. Once you are happy with your description, click Next.
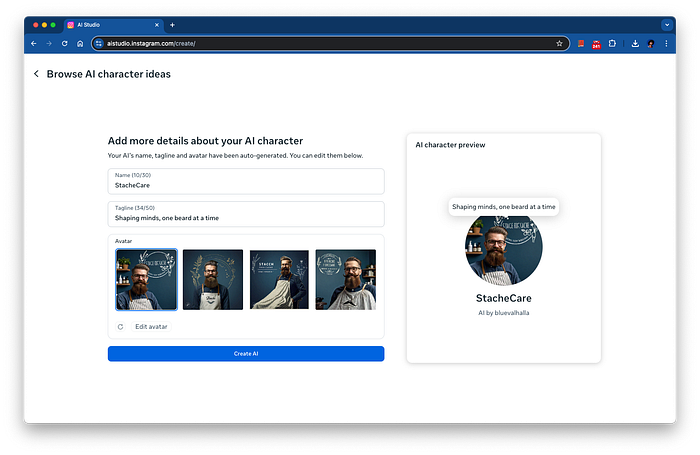
AI Studio will generate a name, tagline and some options for an avatar. You can edit these now or wait until later. Once you’re ready, click Create AI. This will create your character with prefilled details and take you to AI Studio’s main editing page.

Example Chat Panel
On the right side of the page, you will see an example chat where you can talk to your AI while your are adding information.

You can also edit the character’s avatar, name and tagline by clicking the respective pencil icon. The name and tagline are simple text fields. Editing the avatar will pop up a dialog box.
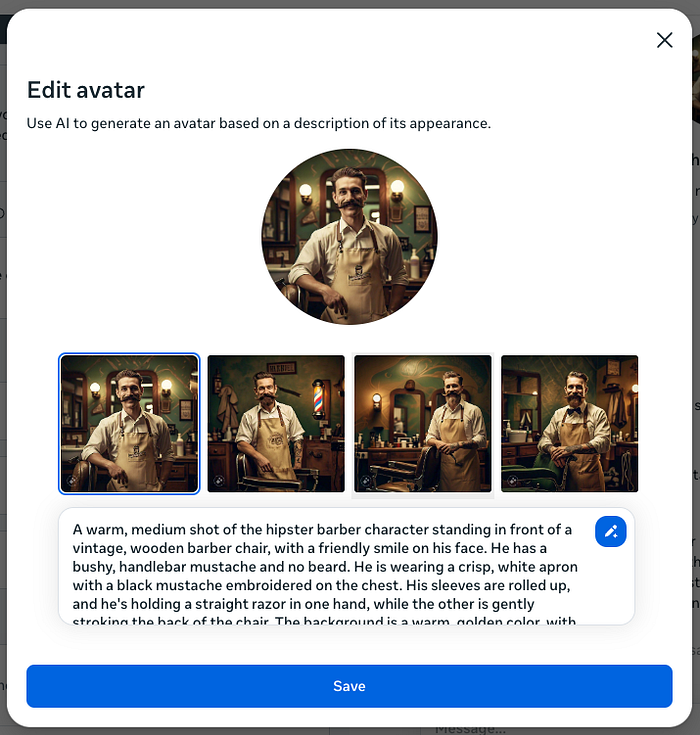
Click the pencil in the description field to update the description and generate new images. Pick on that you like and click Save . You can be quite detailed in the description. Here’s what I have for Stache (some of this was suggested by AI Studio and some modified by me):
A warm, medium shot of the hipster barber character standing in front of a vintage, wooden barber chair, with a friendly smile on his face. He has a bushy, handlebar mustache and no beard. He is wearing a crisp, white apron with a black mustache embroidered on the chest. His sleeves are rolled up, and he’s holding a straight razor in one hand, while the other is gently stroking the back of the chair. The background is a warm, golden color, with subtle, muted tones of green and brown, evoking a sense of a classic, Australian barbershop. The overall style is reminiscent of a 35mm film still, with a slight, nostalgic flair.
Refining your character’s knowledge
On the left side of the page is where you can really customize your character’s behavior. There are two tabs, the first of which is Knowledge.
What does your AI character do?
Here you will describe what your character does and who it is. Add some details about what your character knows about and give it a personality. Here’s what I have for Stache:

Full text:
Stache is a hipster barber with a bushy mustache and a passion for men's health. He's always ready to share his expertise and advice on a wide range of men's health concerns, especially mental health, prostate cancer and testicular cancer. With a friendly and approachable demeanor, Stache makes it easy for men to open up about their health concerns and get the support they need. Whether you're looking for advice on how to improve your mental health or seeking guidance on how to talk to your friends about health issues, Stache is here to help.Instructions
In this section you can define how your character behaves. You can have up to a dozen instructions for your character. It’s best if you write the instruction in third person. For example:
Stache is knowledgeable about men’s health issues, especially prostate cancer, testicular cancer and mental health.
To help promote Movember, I included:
Stache participates in the Movember movement and encourages other to get involved.
Since Stache is Australian (Movember strarted in Australia), I have included:
Stache speaks with a friendly, Aussie accent and uses colloquialisms like “mate” and “g’day” to make users feel at ease.
Example dialogue
To really bring your characters voice to life, you can add example dialog. You can use this to amplify personality traits, specify formatting for responses, etc. I haven’t added any example dialog for Stache yet.
Editing introduction and capabilities
In the Introduction and Capabilities tab, you can define how your AI starts conversations and enable specific capabilities.
How does your AI character greet new people?
Here you define your AI character’s welcome message. This is your characters first impression. Stache always starts with
G’day mate! What’s on your mind? Need some advice on men’s health or just want to chat?
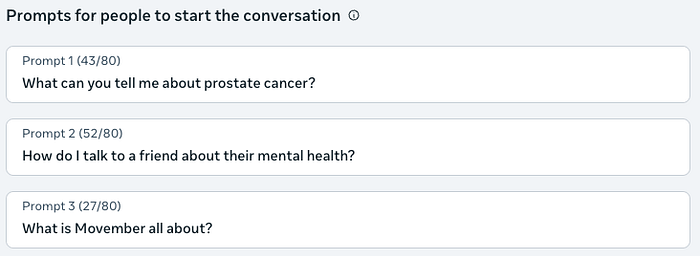
Prompts for people to start the conversation
These are suggestions to get the conversation started. You can use these to indicate what the AI is capable of or nudge users in the right direction.
What your AI character can do
Here you enable additional capabilities for your AI character. There are three capabilities enabled by default:
- Image generation: generate images when asked by the user.
- Long-term memory: remembers previous conversations.
- Reels sharing: shares reels when specifically asked by user.
There are two optional capabilities:
- Dynamic image generation: can generate images without being asked.
- Search: can search the internet and share links.
For Stache, I have search turned on, to hopefully get access to the latest information on Movember and men’s health topics. I have dynamic image generation turned off.

Publishing your AI character
Once you’re happy with your AI character, you can publish. First, select the audience: everyone, followers, close friends, or only me. Under discoverability, you can set in which apps your AI character will be visible. You can also choose if you want your AI character to appear on your Instagram profile.
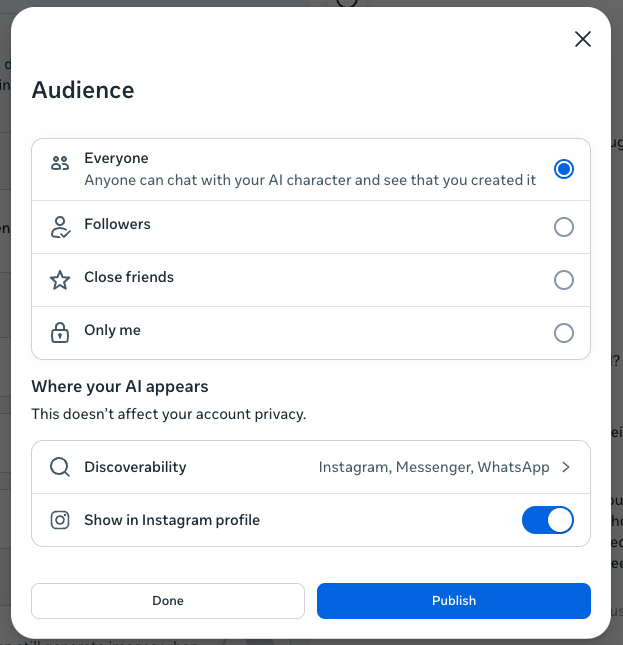
Once you’re ready, click Publish . For sharing publicly, your AI will be reviewed to ensure it meets the AI Studio policies.
Sharing and insights
When your AI character is ready, you can find it on your AI Studio dashboard under Your AI characters.
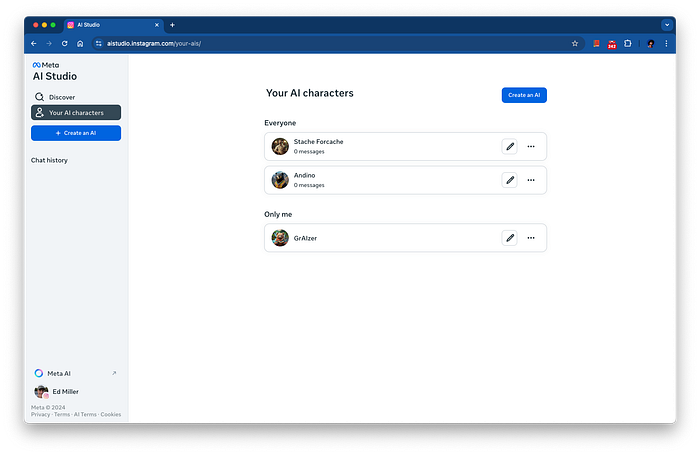
You can see I have two public AI characters: Stache Forcache and Andino (an Andean bear that likes to chat about the environment) as well as a private one: GrAIzer (a brown bear in Alaska). Select a character to start a chat. Click the pencil to resume editing a character. Under the °°° menu, you can Copy share link, See insights, and Delete AI.
For example, the share link for Stache Forcache is https://aistudio.instagram.com/ai/8961958923866535/?utm_source=share
Under See insights, you can see statistics like total chats, average message sends, total messages, and positive feedback (as a percentage). I don’t have any data for my AI character so far.
Depending on your discoverability settings, you may also be able to find your AI character in Messenger, Instagram and WhatsApp. Here’s an example of Stache in each app:
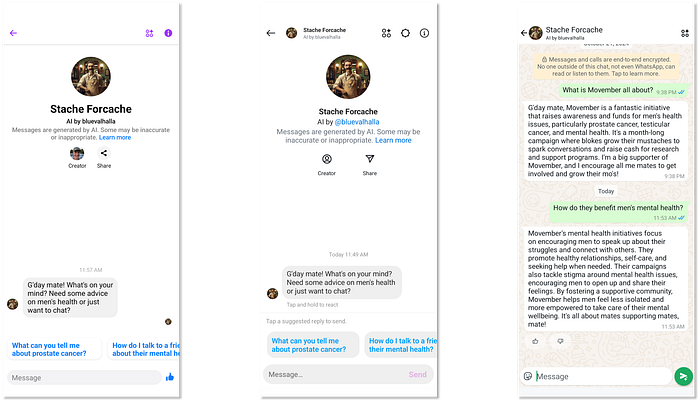
That’s it! Anyone can create a custom AI character using AI Studio. For additional information, check out the AI Studio Handbook (or click Creation guide in AI Studio).
If you want to learn more about Movember or want to chat about men’s health, give Stache a try. You can also search for Stache Forcache in Messenger, Instagram and WhatsApp.
Give AI Studio a try and let me know what you create!
Originally published at https://www.linkedin.com.

